Between work and raising the kiddos, it’s tough to make time for a workout. While you might be used to training four or five days a week, your schedule might no longer allow it.
Continue your yoga practice with these poses that can help you build strength, even on busy days when the weights are out of reach.
Boat Pose
Navasana 1 of 17
This pose not only strengthens your abdominal muscles, but it also strengthens the hip flexors and tests your balance. It can be quite challenging at first, so work your way through the different variations until you find one that challenges you, but is sustainable.
To do this pose:
- Sit on the floor with your knees bent and your feet flat on the floor. Gently sit back until you feel your sitting bones and tailbone touching the floor, creating a tripod of support.
- Keep your back straight and make a "V" shape between your thighbones and torso. Stretch your arms in front of you along your legs. If this is enough of a challenge, stay with this.
- Otherwise, begin to lift the legs until the toes are even with your knees and shins are parallel to the floor.
- Once you've mastered that, straighten the legs all the way and point the toes, moving into full boat pose. Hold for 5-10 breaths then relax. Repeat up to 5 times to see results.
FIND:
More YogaChair Pose
Utkatasana 2 of 17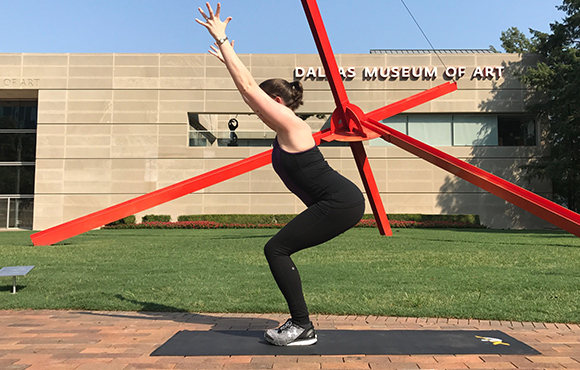
One of the best ways to strengthen the legs and glutes is the Chair Pose, or Utkatasana. Squeezing the thighs while simultaneously squatting toward the floor creates full-body engagement, and you'll be sweating in no time. This pose mimics a squat you might see in a traditional fitness class, but with the legs squeezed together.*
To do this pose:
- Come to standing with your feet comfortably together and hands by your sides.
- Begin to bend the knees and squeeze the thighs together as you sit the hips back like you're sitting in a chair. Most of your weight should be in your heels, and you should be able to see your toes in front of your knees.
- Keep your chest lifted and raise your arms by your ears. Looking upward helps prevent the chest from pitching forward. To intensify, sit more deeply until your hips become even with your knees. *If you struggle with sciatica or other low back pain, separate the feet so they are hip-width apart, instead of squeezing to the centerline.
- Breathe in this position for 5-10 breaths, then stand up straight, releasing the legs and arms down by your sides.
FIND:
More YogaCrescent Lunge
Anjaneyasana 3 of 17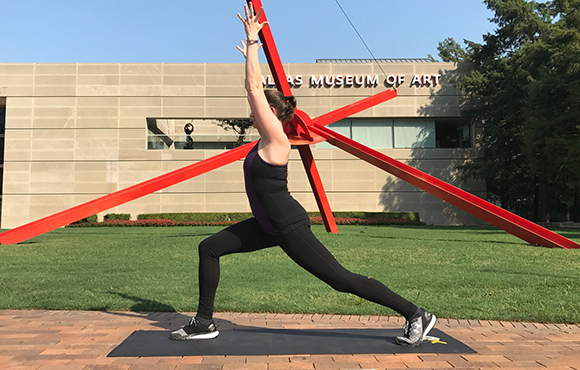
This pose may be familiar to you, as it's similar to the basic lunge you might see in a fitness class. Luckily, there is a lot you can do with this pose to build strength in the thighs and gluteus muscles, as well as stretch the hips and quadriceps.
To do this pose:
- From a Downward-Facing Dog, step or place your right foot forward next to your right thumb, aligning the knee directly over the ankle. You can stay low to start, and if your quad is on fire, lower the back knee to offer some support.
- Once you've mastered this, move to lifting the knee, then lift the torso up so the shoulders align directly over the hips.
- Reach arms overhead with palms facing toward one another.
- For additional strength work, perform 5-10 lunges, hovering the back knee two inches off the ground, then lifting back up. Repeat with the left leg forward.
FIND:
More YogaUpper Plank Pose
Ardha Chaturanga Dandasana 4 of 17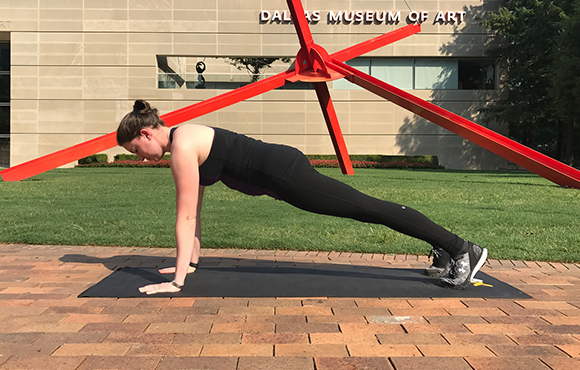
Like its name, this pose teaches you to be strong like a sturdy plank. It gives you the core strength and heat needed to build into more complex yoga postures. Like many poses in yoga, it creates strength in many areas of the body, including the abdominal muscles, shoulders, and even quadriceps. It's a great pose to help keep wrists injury-free, however if your wrists get tired, you can lower onto your elbows.
To do this pose:
- From Downward-Facing Dog, shift the shoulders forward so they line up perfectly over the wrists. (You may have to wiggle the toes back a little bit, and that is okay.)
- Create a long, straight line from the crown of your head, through the back and all the way through the legs and heels. Keep the butt low and in line.
- Draw the navel up toward the spine, as the quadriceps lift toward the thighbones. Press through the hands so the upper back rounds slightly, and the chest doesn't sink.
- If this places too much weight on the shoulders or wrists, bring the knees down to the floor. This still builds strength, but with half of the body weight.
- Hold for 5 breaths, then release back into your Downward-Facing Dog or Tabletop.
FIND:
More YogaLower Plank
Chaturanga Dandasana 5 of 17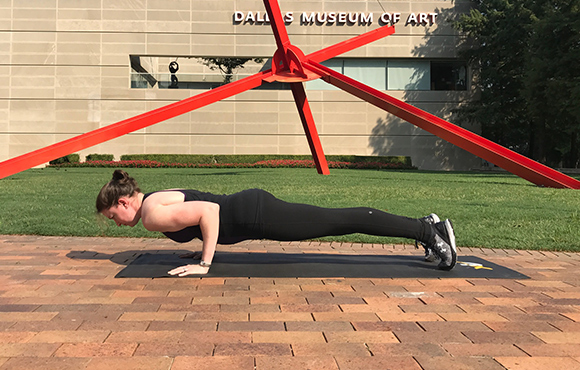
Traditional wide-armed push-ups are great for building pectorals, but to build sleek triceps, look no further than the yoga push-up, Chaturanga Dandasana. This one takes time to perfect, but once you do, your arms will thank you.
To do this pose:
- From your Upper Plank pose, begin to lower the body, bending the elbows to a max point of 90 degrees. Hug elbows in toward your body. If your elbows flare out to the side, you might play with rotating your hands outward until you can safely squeeze the elbows in toward your ribs.
- Chaturanga can be performed with knees down or knees lifted. Various methods of yoga will instruct you to look either forward or down; simply choose what works best for your neck and shoulders.
- Lower from Upper Plank to Lower Plank then push straight back up to Upper Plank, then back to Downward-Facing Dog. Repeat 5-10 times to build the triceps.
FIND:
More YogaSide Plank Pose
Vasisthasana 6 of 17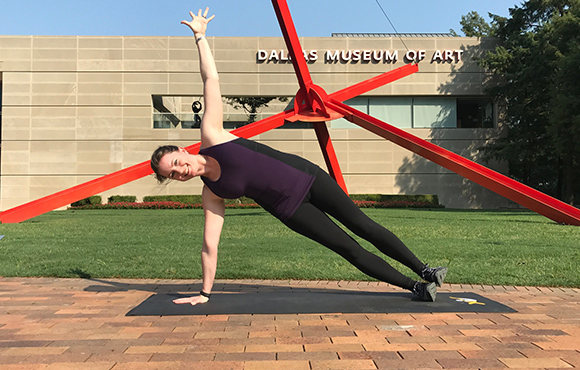
Take your planks to the next level by balancing on one hand and engaging the obliques. Side Plank helps build core strength, this time in the side body. It also adds intensity to the wrist and shoulder strengthening of the Upper Plank Pose as you shift to support your body weight on one arm.
To do this pose:
- From your Upper Plank Pose, rotate the feet to the right side and lift the right arm, reaching through the fingers. Keep the hips moving up, and engage the side abdominal muscles to support the posture.
- Check to ensure the supporting hand is underneath the shoulder to keep the shoulder cuff safe.
- For beginners, the bottom knee can come down onto the floor, with the knee directly underneath the hip.
- Once you've mastered this, begin to lift the top leg so it floats parallel to the floor, adding intensity to the balance. When the feet are stacked, you can also lift the top leg to increase the intensity. Hold for 5 breaths, then repeat on the other side.
FIND:
More YogaWarrior 3
Virabhadrasana III 7 of 17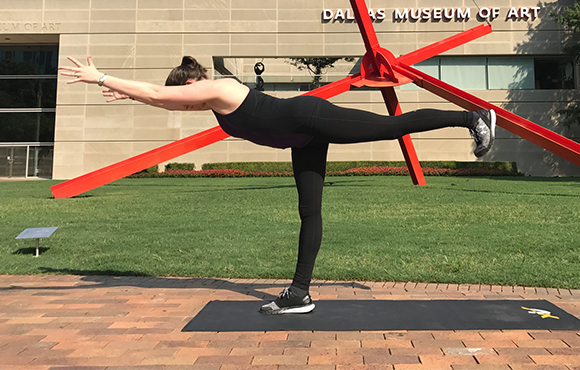
This yoga pose tests your balance as it strengthens the back body. Not only does it strengthen your ankles and legs as you find balance on one leg, but it also strengthens the back, glutes and back of the leg as you lift in the back body to maintain balance and shape.
To do this pose:
- Start standing, and reach your arms straight up overhead. Bring your right toes slightly behind your left heel, then, while thinking of your body as a teeter-totter, begin to lift the right leg as you tilt the torso forward. Tilt unti you make a straight line from your fingers through your back and all the way through your right heel behind you. Your body will resemble a capital letter "T."
- If your arms get tired, you can bring them by your sides. Keep the chest somewhat lifted, so the shoulder blades and back are engaged.
- Press through the heel, and keep the toes pointing down. This action will help you maintain the balance. Hold for 5-10 breaths, then repeat with the left leg floating. (If balancing freely is challenging, you can stand near a chair or a wall to assist with the balance as you strengthen the back.)
FIND:
More YogaDownward-Facing Dog
Adho Mukha Svanasana 9 of 17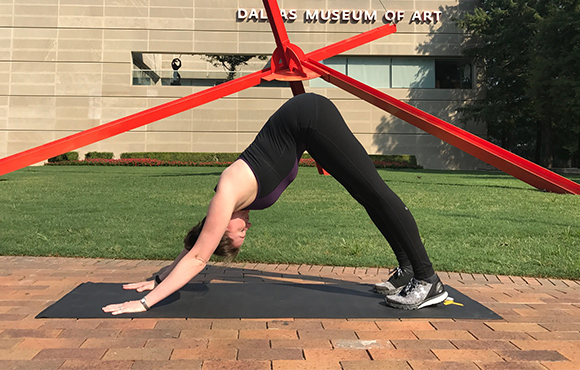
If you've been to a yoga class or watched any yoga videos, you are likely familiar with the Downward-Facing Dog. To the seasoned practitioner, it might feel like a resting pose, but for beginners it's a fantastic place to start building strength. This pose is a traditional staple of many styles of yoga, and in addition to its health benefits, it's a great strength-builder.
To do this pose:
- Start in a Tabletop position with your hands directly under your shoulders and your knees directly underneath your hips.
- Tuck your toes under and lift your hips to the sky, creating an upside down "V" with your body. Relax your neck so that your ears are between your biceps, and draw the gaze toward your navel, if that's comfortable for you.
- Spread your fingers wide, and press into the thumb and first finger to engage the forearms and prevent your weight from sinking into the wrists. Avoid locking the elbows, and rotate elbows and triceps down toward the floor. This will activate your forearms and shoulders, creating strength in the arms.
- Suck in the belly as you lift the sits bones toward the sky, and allow the core muscles to aid in creating the shape.
- If your hamstrings are tight, bend the knees. The most important thing is to keep the back nice and straight.
- Hold for 5-10 breaths. To come out of the pose, bend your knees and return to tabletop position.
FIND:
More YogaUpper Plank Pose
Ardha Chaturanga Dandasana 10 of 17
Like its name, this pose teaches you to be strong like a sturdy plank. It gives you the core strength and heat needed to build into more complex yoga postures. Like many poses in yoga, it creates strength in many areas of the body, including the abdominal muscles, shoulders, and even quadriceps. It's a great pose to help keep wrists injury-free, however if your wrists get tired, you can lower onto your elbows.
To do this pose:
- From Downward-Facing Dog, shift the shoulders forward so they line up perfectly over the wrists. (You may have to wiggle the toes back a little bit, and that is okay.)
- Create a long, straight line from the crown of your head, through the back and all the way through the legs and heels. Keep the butt low and in line.
- Draw the navel up toward the spine, as the quadriceps lift toward the thighbones. Press through the hands so the upper back rounds slightly, and the chest doesn't sink.
- If this places too much weight on the shoulders or wrists, bring the knees down to the floor. This still builds strength, but with half of the body weight.
- Hold for 5 breaths, then release back into your Downward-Facing Dog or Tabletop.
FIND:
More YogaLower Plank
Chaturanga Dandasana 11 of 17
Traditional wide-armed push-ups are great for building pectorals, but to build sleek triceps, look no further than the yoga push-up, Chaturanga Dandasana. This one takes time to perfect, but once you do, your arms will thank you.
To do this pose:
- From your Upper Plank pose, begin to lower the body, bending the elbows to a max point of 90 degrees. Hug elbows in toward your body. If your elbows flare out to the side, you might play with rotating your hands outward until you can safely squeeze the elbows in toward your ribs.
- Chaturanga can be performed with knees down or knees lifted. Various methods of yoga will instruct you to look either forward or down; simply choose what works best for your neck and shoulders.
- Lower from Upper Plank to Lower Plank then push straight back up to Upper Plank, then back to Downward-Facing Dog. Repeat 5-10 times to build the triceps.
FIND:
More YogaSide Plank Pose
Vasisthasana 12 of 17
Take your planks to the next level by balancing on one hand and engaging the obliques. Side Plank helps build core strength, this time in the side body. It also adds intensity to the wrist and shoulder strengthening of the Upper Plank Pose as you shift to support your body weight on one arm.
To do this pose:
- From your Upper Plank Pose, rotate the feet to the right side and lift the right arm, reaching through the fingers. Keep the hips moving up, and engage the side abdominal muscles to support the posture.
- Check to ensure the supporting hand is underneath the shoulder to keep the shoulder cuff safe.
- For beginners, the bottom knee can come down onto the floor, with the knee directly underneath the hip.
- Once you've mastered this, begin to lift the top leg so it floats parallel to the floor, adding intensity to the balance. When the feet are stacked, you can also lift the top leg to increase the intensity. Hold for 5 breaths, then repeat on the other side.
FIND:
More YogaBoat Pose
Navasana 13 of 17
This pose not only strengthens your abdominal muscles, but it also strengthens the hip flexors and tests your balance. It can be quite challenging at first, so work your way through the different variations until you find one that challenges you, but is sustainable.
To do this pose:
- Sit on the floor with your knees bent and your feet flat on the floor. Gently sit back until you feel your sitting bones and tailbone touching the floor, creating a tripod of support.
- Keep your back straight and make a "V" shape between your thighbones and torso. Stretch your arms in front of you along your legs. If this is enough of a challenge, stay with this.
- Otherwise, begin to lift the legs until the toes are even with your knees and shins are parallel to the floor.
- Once you've mastered that, straighten the legs all the way and point the toes, moving into full boat pose. Hold for 5-10 breaths then relax. Repeat up to 5 times to see results.
FIND:
More YogaChair Pose
Utkatasana 14 of 17
One of the best ways to strengthen the legs and glutes is the Chair Pose, or Utkatasana. Squeezing the thighs while simultaneously squatting toward the floor creates full-body engagement, and you'll be sweating in no time. This pose mimics a squat you might see in a traditional fitness class, but with the legs squeezed together.*
To do this pose:
- Come to standing with your feet comfortably together and hands by your sides.
- Begin to bend the knees and squeeze the thighs together as you sit the hips back like you're sitting in a chair. Most of your weight should be in your heels, and you should be able to see your toes in front of your knees.
- Keep your chest lifted and raise your arms by your ears. Looking upward helps prevent the chest from pitching forward. To intensify, sit more deeply until your hips become even with your knees. *If you struggle with sciatica or other low back pain, separate the feet so they are hip-width apart, instead of squeezing to the centerline.
- Breathe in this position for 5-10 breaths, then stand up straight, releasing the legs and arms down by your sides.
FIND:
More YogaCrescent Lunge
Anjaneyasana 15 of 17
This pose may be familiar to you, as it's similar to the basic lunge you might see in a fitness class. Luckily, there is a lot you can do with this pose to build strength in the thighs and gluteus muscles, as well as stretch the hips and quadriceps.
To do this pose:
- From a Downward-Facing Dog, step or place your right foot forward next to your right thumb, aligning the knee directly over the ankle. You can stay low to start, and if your quad is on fire, lower the back knee to offer some support.
- Once you've mastered this, move to lifting the knee, then lift the torso up so the shoulders align directly over the hips.
- Reach arms overhead with palms facing toward one another.
- For additional strength work, perform 5-10 lunges, hovering the back knee two inches off the ground, then lifting back up. Repeat with the left leg forward.
FIND:
More YogaWarrior 3
Virabhadrasana III 16 of 17
This yoga pose tests your balance as it strengthens the back body. Not only does it strengthen your ankles and legs as you find balance on one leg, but it also strengthens the back, glutes and back of the leg as you lift in the back body to maintain balance and shape.
To do this pose:
- Start standing, and reach your arms straight up overhead. Bring your right toes slightly behind your left heel, then, while thinking of your body as a teeter-totter, begin to lift the right leg as you tilt the torso forward. Tilt unti you make a straight line from your fingers through your back and all the way through your right heel behind you. Your body will resemble a capital letter "T."
- If your arms get tired, you can bring them by your sides. Keep the chest somewhat lifted, so the shoulder blades and back are engaged.
- Press through the heel, and keep the toes pointing down. This action will help you maintain the balance. Hold for 5-10 breaths, then repeat with the left leg floating. (If balancing freely is challenging, you can stand near a chair or a wall to assist with the balance as you strengthen the back.)
FIND:
More Yoga
About the Author
Summer Hogsed
Yoga Events Near You
Everywhere
-
Kids Yoga in the Salt Cave (B)
Bowling Green, KY
-
Mother's Day Aerial Yoga + Mindfulness Class
Prairie Village, KS
-
Glassblowing: Paperweight (F)
Bowling Green, KY
-
Rockwood Tuesday AM Flow Yoga
Wilmington, DE


Discuss This Article